Hide a drive on your windows machine using just the command promptMethods to hide any drive:Unhide the drive –
Methods to hide any drive:
Step 1: First activate the command prompt. You can do this by searching/running cmd in the search bar of the start menu or by typing and entering it in the run dialog box. In Windows 8.1 and 10, you can access it by hitting a right click on the start button. Step 2: Now that you’re in the command prompt, type Diskpart & hit enter. If prompted with the User Account Control dialog box, click yes.
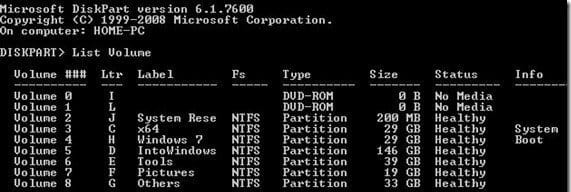
Step 3: Once this is done, type List Volume into the prompt and hit enter. This will display a list of all the drives in the machine as shown below.
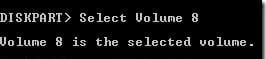
Step 4: Next, you need to select the drive that you want hidden. For example, we will hide the “G” drive by entering Select Volume G or Select Volume 8 since its the 8th drive in the list. Step 5: Now, we can hide the selected drive by entering Remove Letter G.
If you have followed these steps correctly, you should now find the drive hidden on your machine. Now, we begin the steps to reverse this process.
Unhide the drive –
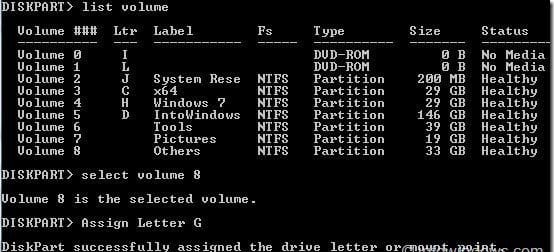
Step 1: Since the first few steps are common, repeat the process mentioned in steps 1,2,3 above thus getting a list of all drives on the machine. Step 2: Select the volume number for which you want to assign a drive letter and show in the explorer. Type Select Volume 8 (here, 8 is the volume number) and press the Enter key.
Step 3: Now, type Assign Letter G and hit enter and you will be able to see the drive in the explorer.